
React Native, a popular javascript-based framework built by Facebook in 2015, uses a Single Codebase applicable for developing apps on Android and iOS. The usage of this framework has increased developer productivity and minimized the learning requirements of other languages such as Objective C, Swift, Java Kotlin, etc. which are needed for Android/iOS app development.
Instead of using HTML and DOM as building blocks for the UI, React Native uses the native core components such as Button, View, Switch, etc. which you’ll find on iOS and Android. The philosophy is to learn once and write anywhere. Today, apps such as Instagram, Facebook, UberEats, Pinterest, Skype, and much more use React Native. You can also integrate this framework with your existing mobile applications!
Note: Written in JavaScript. Runs on React. Rendered with Native Code
Prerequisites
Topics Covered
How does React Native Work: Views
In Mobile development, a View is the basic building block of UI: a small rectangular element on the screen that can be used to display text, images, or respond to user input. Even the smallest visual elements of an app, like a line of text or a button, are kinds of views.
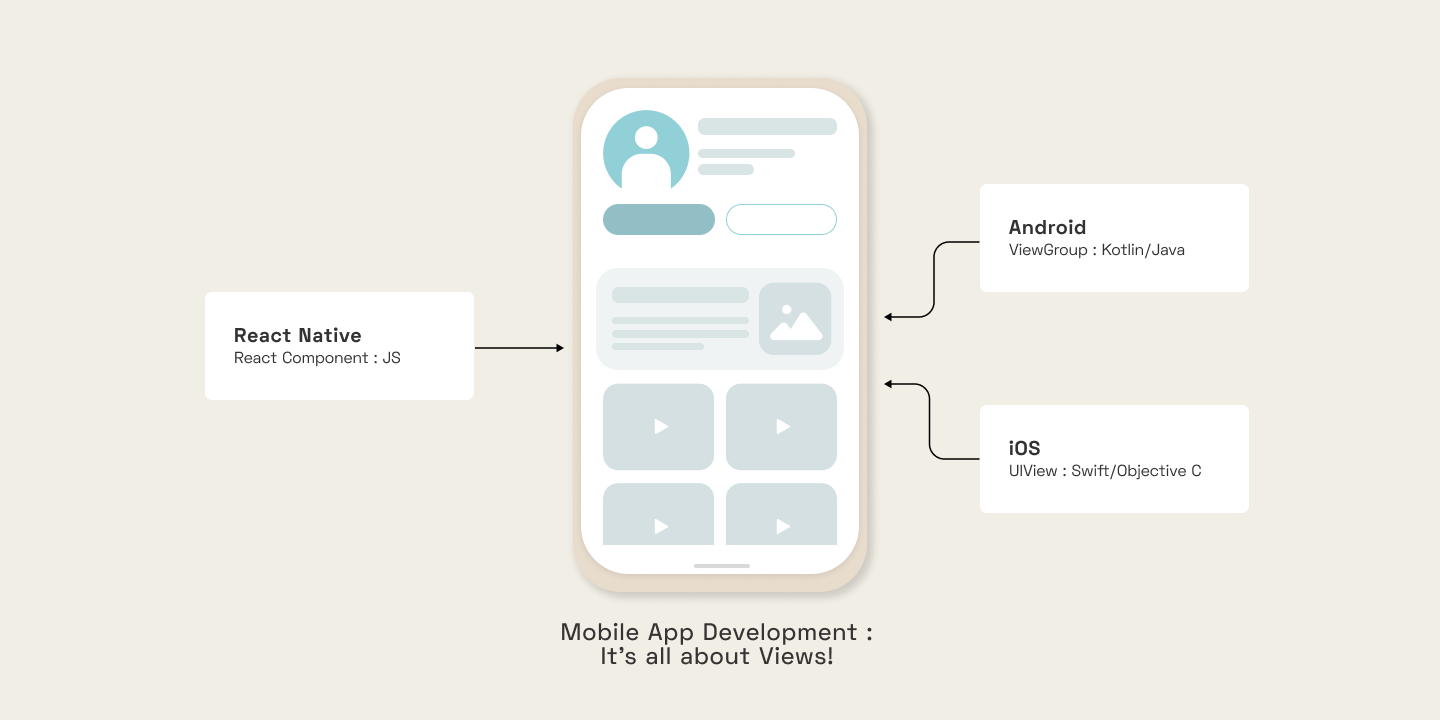
According to the React Native site's introduction, you invoke the views with JavaScript using React components. React Native creates the corresponding Android and iOS views at runtime for those components. Because React Native components are backed by the same views as Android and iOS, React Native apps look, feel, and perform like any other app.
Setup
💡 As a result of the automatic fast reload feature of React Native, there is no need to restart manually after the completion of all these steps.
The app.js file contains the main component, which can be edited as per the project requirements.
Assumptions
import { StyleSheet, Text, View, ScrollView, FlatList, Alert, TouchableWithoutFeedback, Keyboard } from 'react-native';
Adding CSS in React Native
const styles = StyleSheet.create({
  container: {
    backgroundColor: '#fff',
    alignItems: 'center',
    justifyContent: 'center',
  },
  boldText: {
    fontWeight: 'bold',
  },
});
<Text>Name is <Text style={styles.boldText}>{name}</Text> !</Text>
Understanding the React Native Core Components
Core components are a set of essential, ready-to-use native components for quick and easy mobile application development
<View style={styles.header}>
<Text style={styles.boldText}>Name is {name} </Text>
   <Text>Age is {age} </Text>
</View>
1. numeric
2. email_address
<TextInput
   style={styles.input}
   placeholder='e.g. Vertika'
   onChangeText={(val) => setName(val)
   multiline>
</TextInput>
<TextInput
   style={styles.input}
   placeholder='e.g. 20'
   onChangeText={(val) => setAge(val)}
   keyboardType={'numeric'}>
</TextInput>
const colors = [
  { name: 'red', key: 1 },
  { name: 'blue', key: 2 },
  { name: 'orange', key: 3 },
  { name: 'purple', key: 4 }
]

// In the return method

<ScrollView>
   {colors.map(color =>
      <Text key={color.key} style={colorStyles(color.name)}>{color.name}</Text>
   )}
</ScrollView>

// A separate method using CSS styles Dynamically
const colorStyles = (color) => {
  return {
    marginTop: 20,
    padding: 30,
    backgroundColor: color,
    color: "white"
  }
}
<FlatList
   numColumns={2}
   keyExtractor={item => item.id}
   data={colors}
   renderItem={({ item }) => ( // has to be named as "item"
     <Text style={colorStyles(item.name)}>{item.name}</Text>
   )}
/>
<TouchableOpacity onPress={() => pressHandler(item.id)}>

   <Text style={colorStyles(item.name)}>{item.name}</Text>

</TouchableOpacity>
Alert.alert('OOPS!', 'Todo must be atleast 3 characters long.', [
  { text: 'Gotcha!', onPress: () => console.log('alert closed.') }
])
<TouchableWithoutFeedback
      onPress={() => Keyboard.dismiss()}
<WrappedComponent/>
</TouchableWithoutFeedback>
FlexBox in React Native
const styles = StyleSheet.create({
  container: { // outermost component
    flex: 1,
flexDirection:'row',
    justifyContent:'space-around',
alignItems:'stretch',
  }
})
Adding Custom Fonts to React Native
To add custom fonts to your react-native project, the expo-font library can be used. With the help of this, fonts can be loaded from the web and then be used in React Native components. One can download the required fonts, copy them into the assets folder, and include them in the App.js or other JS file using the loadAsync() method.
import * as Font from 'expo-font';
const getFonts = () => { return Font.loadAsync({
  'nunito-regular': require('./assets/fonts/Nunito-Regular.ttf'),
  'nunito-bold': require('./assets/fonts/Nunito-Bold.ttf')
})}
Apps.js
loadAsync() is a highly efficient built-in method, that loads font from a static resource. Any string can be used as the font-family name. Secondly, you need to add these fonts to the styles of your components.
<Text style={{fontFamily: 'nunito-bold'}, fontSize: 20}>This is home screen</Text>
MyComponent.js
It is a good UI approach (for better optimization) to display components to the screen only when the assets such as custom fonts, icons, and logo images are completely loaded. Therefore, state management (the useState hook) is applicable here, along with another expo library called expo-app-loading which tells the expo-splash-screen to keep the screen visible while the AppLoading component is mounted. You can read more about it here.
Install the library using - expo install expo-app-loading
import AppLoading from 'expo-app-loading';
export default function App() {
  const [fontLoaded, setFontLoaded] = useState(false);
  if (fontLoaded) {
    return <MyComponent />
  }
  else {
    return (
      <AppLoading
        startAsync={getFonts}
        onFinish={() => setFontLoaded(true)}
        onError={(err) => console.log(err)}
      />);
  }

}
Apps.js
The AppLoading component makes a call to the getFonts() method, and when the fonts are finished loading, we call the setFontLoaded() method and set fontLoaded to true causing re-rendering. Thus, <MyComponent/> gets rendered.
Conclusion & Future Work
With React Native, programmers can create multi-platform applications with one technology - React, making the product cost-efficient. The Core components that we just discussed and many more, map directly to the platform’s native UI building blocks. This was just an introductory blog, and there is much more to learn in React Native, such as Navigation, Error handling, Images, Forms, etc. that shall be covered soon by us. Stay tuned for more updates!
React Native, a popular javascript-based framework built by Facebook in 2015, uses a Single Codebase applicable for developing apps on Android and iOS. The usage of this framework has increased developer productivity and minimized the learning requirements of other languages such as Objective C, Swift, Java Kotlin, etc. which are needed for Android/iOS app development.